Installing a handicap rail—also called a shower grab bar—can make a U.S. bathroom safer for people who need help standing, sitting, or keeping balance. The rail must connect to solid wall framing or properly installed reinforcement. Screwing it only into tile, drywall, or a plastic shower surround is not safe.
The best method is to plan the rail location first, check the wall for a stud or blocking, follow the grab bar manufacturer’s instructions, and seal every hole against water. If you cannot find strong framing, or if the shower wall is already finished and you are unsure about its construction, hire a qualified contractor.

Quick Answer: The Safe Way to Install a Shower Grab Bar
To install a handicap rail in a shower:
- Choose the rail position based on how the user enters, sits, stands, and turns.
- Check for wood studs, steel studs, or solid blocking behind the wall.
- Mark the holes and confirm that the rail will be level.
- Drill through the tile with the correct bit, if needed.
- Fasten the rail into framing or approved structural reinforcement.
- Use fasteners approved by the rail manufacturer.
- Seal the mounting holes with a compatible bathroom sealant.
- Test the rail with firm, gradual pressure before use.
A grab bar is a safety device, not a towel bar. Do not rely on suction-cup, adhesive-only, or spring-loaded rails for full body support unless the product is specifically designed and approved for that purpose. Many temporary rails can shift without warning.
The Americans with Disabilities Act (ADA) provides accessibility standards for covered public facilities and commercial spaces. It does not automatically require every private home in the United States to meet ADA standards. However, ADA dimensions are a useful design reference, and local building codes may apply to remodeling work. Check your city, county, or state requirements before starting.
Choose the Right Rail and Location
The right rail depends on the user’s movement, the shower layout, and the wall structure. A horizontal rail often helps with transfers and standing. A vertical rail can help a person enter the shower or turn. A diagonal rail may suit some users, but it must be positioned for the person’s actual grip and movement.
Common locations include:
- At the shower entrance: Helps with stepping over a curb or threshold.
- On the side wall: Helps a user enter, turn, or steady themselves.
- On the back wall: Helps with balance while standing.
- Near a shower seat: Helps with sitting down and standing up.
- Inside a tub-shower combination: Helps with stepping over the tub wall.
Ask the person who will use the shower to demonstrate the motion safely before marking the wall. A rail that looks well placed to one person may be too high, too low, or too far away for another.
Useful U.S. accessibility dimensions
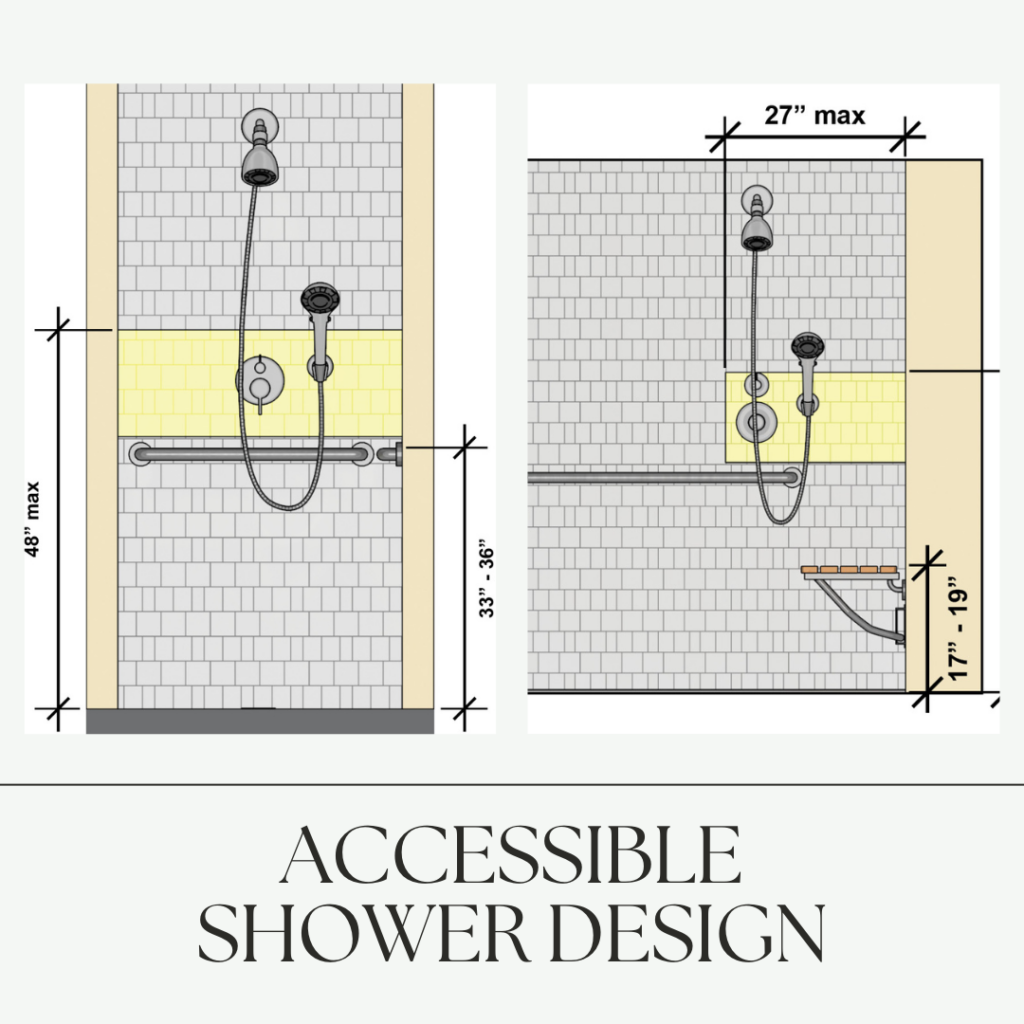
The 2010 ADA Standards for accessible Design generally specify a 1¼- to 1½-inch outside diameter for grab bars and at least 1½ inches of clearance between the rail and the wall. The standards also address length, position, clearance, and structural strength for accessible toilet rooms and showers.
These measurements are references, not a substitute for a personal fit assessment. In a private home, the best height may differ because of the user’s height, reach, balance, wheelchair transfer, or shower seat. A physical or occupational therapist can help determine a safer position for a person with complex mobility needs.
Select a rail with a secure grip
Choose a rail that:
- Has a textured or non-slip grip.
- Supports the user’s body weight when properly installed.
- Has mounting flanges that fit the wall and framing.
- Resists rust in a wet environment.
- Provides enough length for a full hand grip.
- Has clear installation instructions and fastener requirements.
Avoid using a polished towel bar, shower door handle, or decorative wall bar as a support rail. These products may not be designed for sudden or sustained body weight.

Check the Wall Before Drilling
The wall structure determines whether the installation is safe. A grab bar should transfer force through its fasteners into studs, blocking, or another structural support system. Tile and drywall can hold the rail in place visually, but they usually cannot support a person during a slip.
Wood-framed walls
Wood studs are common in U.S. homes. A stud finder can help locate them, but electronic stud finders can give false readings around tile, cement board, plumbing, and metal corners. Confirm the stud location with careful measurements, a small test hole in a safe area, or access from the opposite side of the wall when possible.
Do not assume that studs are spaced in a way that matches the rail’s mounting holes. The rail may require a longer model, different orientation, or additional blocking.
Steel-stud walls
Steel studs may not provide the same holding power as wood framing. A typical drywall screw is not enough for a safety rail. Installation may require structural backing, specialized anchors, or a design approved for the exact wall system.
Ask a contractor to inspect the wall if you cannot verify the steel stud gauge and connection method.
Finished shower walls
A finished wall may contain:
- Ceramic or porcelain tile.
- Natural stone.
- Cement backer board.
- Fiberglass or acrylic panels.
- Waterproof membranes.
- Plumbing lines and electrical wiring.
Drilling blindly can crack tile, puncture a waterproof layer, or damage a pipe. Use the rail manufacturer’s instructions and identify the wall layers before drilling. If the wall has no suitable backing, the most reliable repair may require removing part of the finish and adding blocking.
New construction or open-wall remodeling
The easiest time to install a grab bar is before the wall is closed. A carpenter or remodeler can add solid blocking between the studs at the planned rail locations. The blocking should be sized and fastened for the rail design, not merely placed near the general area.
Record the blocking locations before installing tile or wall panels. Photos and measurements can help future homeowners locate the support without guesswork.
Tools and Materials
Gather the following items before beginning:
- Shower grab bar rated for the intended use.
- Manufacturer-specified screws or bolts.
- Stud finder and tape measure.
- Level.
- Pencil or removable marking tape.
- Drill and suitable drill bits.
- Carbide or diamond tile bit for ceramic or porcelain tile.
- Masonry bit for cement board or masonry.
- Screwdriver or driver bit.
- Safety glasses.
- Masking tape.
- Bathroom-grade silicone sealant.
- Clean cloth.
- Stud or backing verification tools.
The correct fastener depends on the rail, wall, and framing. Do not replace the supplied hardware with shorter screws, drywall anchors, or general-purpose construction screws without confirming that the replacement is suitable.
If the rail must attach between studs, use a properly engineered mounting system. Some products use a structural plate, toggle system, or reinforcement method designed for finished walls. Follow the product instructions exactly; a common hollow-wall anchor is not automatically suitable for a grab bar.

Step-by-Step: How to Install a Handicap Rail in a Tiled Shower
1. Plan the user’s movement
Have the user explain or demonstrate where help is needed. Consider the full movement path:
- Where does the user place their first foot?
- Do they step over a curb or tub wall?
- Where do they sit or stand?
- Which hand is stronger?
- Does a walker or wheelchair need room to pass?
- Does the user need one rail or more than one?
Keep the rail away from shower controls, shelves, doors, and sharp edges. Make sure the user can wrap their hand around the rail without striking a wall or fixture.
2. Confirm the wall support
Use a stud finder, measurements, inspection holes, or access from an unfinished wall to locate framing. Mark the center of each stud or the limits of the structural blocking.
If the mounting holes do not align with solid support, stop and change the plan. Do not force the rail into a weak location simply because it looks convenient.
3. Hold the rail in position
Place the rail on the wall and mark its mounting holes. Use a level to check horizontal or vertical alignment. For a diagonal rail, follow the manufacturer’s angle and confirm that the user can grip the full length.
Check the rail from outside the shower as well. It should not interfere with the shower door, curtain, seat, controls, or the user’s head and shoulders.
4. Protect the tile and wall
Place masking tape over each mark. The tape can reduce bit wandering and help protect the surface glaze.
Before drilling, check for plumbing and electrical hazards. Never drill where pipes, wires, valves, or fixtures may be located. If you cannot determine what is behind the wall, obtain professional help.
5. Drill the holes correctly
Use a bit designed for the wall material. For tile, begin slowly and avoid hammer mode until the bit has passed through the tile, if the tool and bit instructions permit it. Apply light pressure and keep the drill straight.
The hole should match the specified fastener and clearance. An oversized, chipped, or angled hole can reduce holding power and make waterproofing harder.
6. Apply sealant
Clean dust from the hole and mounting surface. Apply a compatible bathroom sealant around the fastener entry point or behind the mounting flange as directed by the manufacturer.
The sealant should help block water from reaching the wall cavity. It does not replace structural support. A waterproof bead cannot turn a weak anchor into a safe grab bar.
7. Fasten the rail to structural support
Position the rail and install the specified fasteners. Tighten them evenly and firmly, but do not crush the tile, distort the flange, or strip the screw head.
The mounting flange should sit flat against the wall. If it rocks, gaps, or pulls away as you tighten the fasteners, stop and correct the problem.
8. Allow the sealant to cure
Follow the sealant label and rail instructions before exposing the area to water. Cure time varies by product, temperature, humidity, and joint size.
Do not test the rail by suddenly hanging from it. Begin with firm hand pressure and increase pressure gradually. The rail should not move, creak, rotate, or separate from the wall.

How to Tell Whether the Installation Failed
Stop using the rail if you notice any of these signs:
- The rail twists or rotates.
- A flange lifts away from the wall.
- Screws spin without tightening.
- Tile cracks around a mounting hole.
- The wall flexes when pressure is applied.
- Water enters around the flange.
- The rail makes a new popping or creaking sound.
- The fasteners pull out or leave enlarged holes.
The most common causes are missing blocking, the wrong anchor, a screw that is too short, a hole that is too large, or a rail installed over a hollow wall without proper reinforcement.
Do not solve movement by adding more caulk, larger washers, or extra screws in random locations. Remove the rail and repair the structure. If water has entered the wall, inspect for damp insulation, damaged backer board, mold growth, or framing damage.
A rail that was installed into a stud but has a loose flange may need the correct fastener or a repaired mounting surface. A rail that has pulled out of drywall usually needs structural reinforcement, not a stronger drywall plug.
Building Code, ADA, and Safety Considerations
Private residences in the United States are not generally required to meet every ADA requirement. ADA rules mainly cover public accommodations, commercial facilities, and certain government facilities. The U.S. Access Board publishes the technical requirements used as a reference for accessible design.
Local residential building codes, plumbing codes, rental rules, and permit requirements may still affect a bathroom remodel. Requirements can vary by state, county, and city. Contact the local building department before changing walls, plumbing, electrical systems, or a shower pan.
For a professional installation, use a contractor familiar with accessible bathroom work. A licensed plumber may be needed if the work affects plumbing. A qualified remodeler can inspect framing, waterproofing, and the shower assembly together.
Extra caution is needed when:
- The user is likely to fall without the rail.
- The user will place their full weight on the rail.
- The wall is an exterior wall or masonry wall.
- The shower contains a steam system.
- The wall has a waterproof membrane that must remain intact.
- The user transfers from a wheelchair.
- The shower includes a folding seat.
- The rail must support a caregiver as well as the user.
A properly installed grab bar can reduce risk, but it cannot prevent every fall. Keep the floor clean, use adequate lighting, control water temperature, and consider a shower chair or handheld shower when appropriate.

Maintenance After Installation
Inspect the rail at least every few months and after any hard impact. Hold the rail and apply moderate hand pressure in several directions. Do not use sudden jerks or body weight for routine testing.
Check for:
- Loose screws.
- Corrosion.
- Cracks in tile or grout.
- Sealant gaps.
- Movement at the flange.
- A worn or slippery grip.
- Water staining around the mounting points.
Clean the rail with a product approved for its finish. Avoid harsh chemicals that can damage coatings or make the grip slick. Re-sealing the edge may help keep water out, but it does not correct a loose mounting system.
Common Installation Mistakes
Installing into drywall alone
Drywall anchors may hold light accessories, but many are not designed for the force created when a person slips. Use framing, blocking, or a tested structural mounting method.
Using a towel bar as a grab bar
A towel bar may look similar to a grab bar but often has a weaker tube, lighter brackets, or decorative mounts. Use a product specifically rated for support.
Relying on suction cups
Suction rails can lose grip because of textured tile, grout joints, dust, soap film, temperature changes, or a small leak in the seal. Treat them as temporary aids only if the manufacturer clearly states their intended use. Do not assume that a suction indicator guarantees safe support.
Ignoring waterproofing
A hole through tile can become a path for water. Seal the penetration as instructed and avoid drilling through the shower pan or plumbing.
Choosing height by appearance
A rail that looks centered may still be hard for the user to reach. Set the height based on the user’s hand position and movement.
Testing too aggressively
Do not swing, hang, or jerk on a new rail. First confirm that the fasteners are correct, the flange is flat, and the sealant has cured. If the rail shifts under normal hand pressure, do not use it.

Frequently Asked Questions
Can I install a shower grab bar without opening the wall?
Sometimes. If the rail lines up with existing studs, you may be able to install it through the finished wall. Some products also use engineered mounting systems for finished walls. The system must be approved for the specific wall type and intended load. If there is no verified structural support, opening the wall to add blocking is often the safer option.
How high should a handicap rail be in a shower?
There is no single height that fits every person or shower. A common design reference is the ADA grab-bar range, but private homes should also consider the user’s height, reach, transfer method, and shower seat. The best location allows the user to grip the rail before losing balance and maintain a natural elbow position.
Are suction-cup shower grab bars safe?
They may help with temporary balance for some users, but they should not be treated as equal to a permanently fastened grab bar. Suction depends on the surface, seal, cleanliness, temperature, and product condition. Do not use one for full body weight unless the manufacturer specifically provides that rating and installation condition.
What if there is no stud where I need the rail?
Use a rail with a suitable structural mounting system, add blocking behind the wall, or choose a different rail position. Do not rely on a standard plastic drywall anchor for a critical support rail unless the complete system is specifically designed, tested, and approved for that use.
Should the rail be horizontal, vertical, or angled?
The best orientation depends on the movement. A vertical rail often helps with entry. A horizontal rail can help with standing or transfers. A diagonal rail may provide a comfortable grip for some users. More than one rail may be appropriate in a larger shower.
Final Recommendation
Install a handicap rail only where the fasteners connect to verified structural support. Plan the position around the user’s real movement, protect the shower’s waterproofing, and follow the rail manufacturer’s fastener instructions.
If you cannot confirm the framing, the shower wall is finished with complex tile or stone, or the rail will carry a person’s full weight, have a qualified U.S. contractor inspect and install it. The safest rail is the one that is correctly positioned, firmly anchored, properly sealed, and easy for the user to reach.

Michael Reynolds is a senior contributor at RetirementGazette.com, where he focuses on helping readers navigate the journey toward a secure and fulfilling retirement. With over a decade of experience in personal finance, retirement planning, and lifestyle writing, Michael combines practical strategies with easy-to-understand guidance tailored for both pre-retirees and those already enjoying their golden years.