Tighten the cable or barrel adjuster and test until both brakes hold firmly and evenly.
I have worked with mobility aids for years and helped many people learn how to adjust the brakes on a rollator walker safely and easily. This guide walks you through the parts, the tools, step-by-step instructions, quick troubleshooting, and maintenance tips. You will learn how to make small adjustments that fix loose brakes, stop dragging wheels, and keep the rollator safe to use. Follow these clear steps and tips to gain confidence in maintaining a smooth, secure braking system.

Understanding the brakes on a rollator walker
A rollator brake is usually a hand-operated cable system that tightens a pad or shoe to slow a wheel. Some models use loop brakes like bicycle brakes. Others use a locking lever or parking lock that holds the brake in place. Knowing the type on your rollator helps you adjust it correctly.
Key parts to know:
- Brake lever on the handle
- Cable or housing that runs from the lever to the wheel
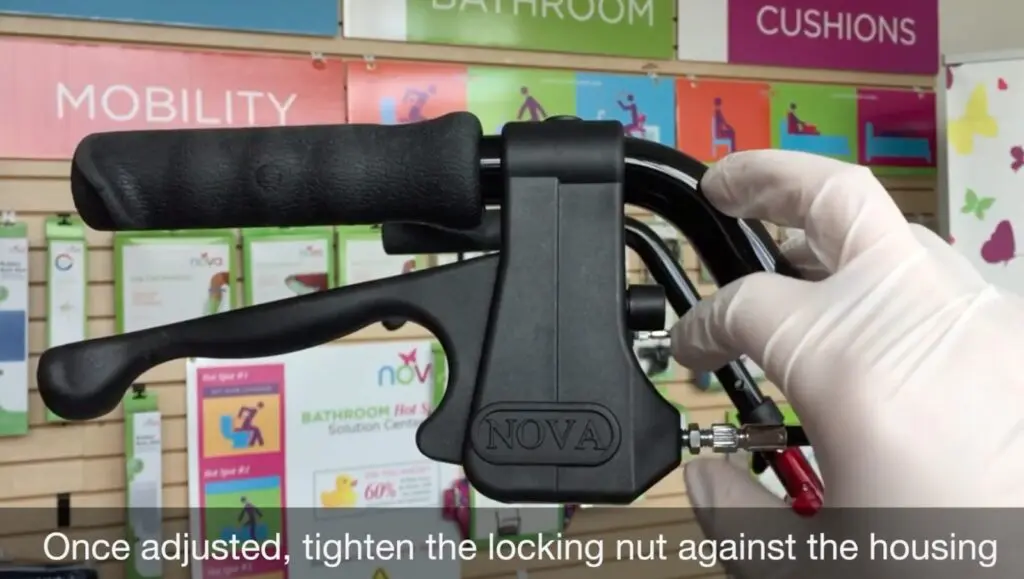
- Barrel adjuster or tension nut
- Brake shoe, pad, or internal mechanism at the wheel
When you learn how to adjust the brakes on a rollator walker, focus on even tension on both sides. Uneven brakes can pull the rollator to one side and make it unsafe.

When and why to adjust the brakes
Adjust brakes when you notice any of these signs:
- Brakes feel loose or spongy at the lever
- Wheels drag when pushing the rollator
- One wheel locks sooner than the other
- Parking lock does not hold the rollator steady
Adjusting the brakes prevents falls and makes walking easier. Small adjustments can restore full stopping power without replacing parts. Regular checks increase confidence and reduce repair costs.

Tools you will need
Gather these simple tools before you start:
- Adjustable wrench or small wrench set
- Pliers or needle-nose pliers
- Screwdriver (flathead or Phillips depending on your rollator)
- Allen key set (if your model uses hex bolts)
- Clean cloth and mild lubricant
Having the right tools makes learning how to adjust the brakes on a rollator walker faster and safer. I recommend keeping a small tool kit with your rollator for quick checks.

Step-by-step: How to adjust the brakes on a rollator walker
These steps cover most cable and lever brake systems. Work on one brake at a time.
-
Prepare and inspect
- Park the rollator on a flat, stable surface.
- Engage the parking brake if available.
- Inspect cables for frays and the brake pads for wear.
-
Test the brake feel
- Squeeze the brake lever. Note how far it travels and how firmly it holds the wheel.
- Compare left and right feel.
-
Use the barrel adjuster (if present)
- Locate the barrel adjuster near the brake lever or at the cable housing.
- Turn the adjuster clockwise to tighten the cable and reduce lever travel.
- Turn counterclockwise to loosen. Make small turns and re-test often.
-
Tighten at the wheel (if no barrel adjuster)
- Find the tension nut at the wheel connection.
- Loosen the lock nut slightly.
- Pull the cable snug by hand or with pliers, then retighten the nut.
- Re-engage the lock nut to secure the setting.
-
Check brake pad alignment
- Ensure the pad or shoe contacts the wheel rim or braking surface evenly.
- Adjust the pad position if your model allows it so it strikes squarely.
-
Balance left and right brakes
- Make equal small adjustments to both sides so the rollator tracks straight.
- Test by pushing the rollator forward and applying both brakes.
-
Final safety test
- With the rollator loaded as it would be in use, apply the brakes and try to push it gently.
- The rollator should not move when brakes are fully engaged.
Practice these steps a few times and keep notes of the settings that work best for your rollator. Learning how to adjust the brakes on a rollator walker takes a little patience, but it becomes quick with practice.

Troubleshooting common issues
Here are quick fixes for frequent problems.
Brake feels spongy or takes too much lever travel
- Turn the barrel adjuster in small steps. If there is no adjuster, tighten the cable at the wheel nut.
- Replace a stretched cable if tightening no longer helps.
One side brakes more than the other
- Check cable tension and pad position. Tighten the looser side and recheck travel on both levers.
- Make sure the wheel bearing is not sticking.
Brake drags when released
- Look for a bent cable housing or debris around the wheel.
- Loosen the cable slightly and clean the wheel area.
Squeaking or grinding brakes
- Clean the braking surface and apply a tiny bit of lubricant away from the pad contact area.
- Replace worn pads or shoes.
Can I adjust brakes without tools?
- Minor tweaks can be done by hand if your rollator has a barrel adjuster. For solid tightening at the wheel, basic tools are needed.
How often should I check the brakes?
- Check monthly and before any long outing. Regular checks catch wear early and keep the rollator safe.
When should I replace cables or pads?
- Replace cables showing frays or rust immediately. Replace pads when they are thin or no longer grip well.
These short answers aim to help you quickly diagnose and fix issues while learning how to adjust the brakes on a rollator walker.

Maintenance and care tips
Routine care keeps brakes reliable and extends part life.
Simple habits to follow:
- Wipe cables and levers with a clean cloth after use.
- Avoid heavy wet conditions when possible; dry and lubricate after exposure to moisture.
- Inspect cables, housing, and pads monthly.
- Replace worn components promptly rather than over-tightening.
I once helped a neighbor who struggled with a squeaky brake. A quick clean and a small part replacement fixed it. That taught me the value of early checks. Small maintenance pays off in safety and fewer repairs.
Safety checks before every use
Always do a short safety check before using the rollator.
Do this quick routine:
- Ensure both brakes engage when the levers are squeezed.
- Test the parking lock while standing behind the rollator.
- Check wheels roll freely when brakes are released.
- Confirm no loose bolts or sharp edges.
If anything seems off, slow down and address it before walking. Safety checks are the best habit for confident use and show why knowing how to adjust the brakes on a rollator walker matters.

Frequently Asked Questions of How to adjust the brakes on a rollator walker
How tight should the brakes be?
Brakes should engage firmly with minimal lever travel. Tighten until the wheel stops quickly but does not rub when released.
Can I adjust both brakes exactly the same?
Aim for equal feel on both levers. Small differences are okay, but large imbalances can pull the rollator to one side.
Is it safe to use pliers to pull the cable tight?
Yes, pliers can be used carefully to tension the cable. Hold the cable steady and avoid cutting or nicking it.
What if the brake still slips after adjustment?
If slipping continues, the cable may be stretched or the pad worn. Replace the cable or pad and re-test.
How long do brake cables usually last?
Cables last several years with normal use but inspect them monthly. Replace them sooner if you see fraying, rust, or reduced performance.
Can I use a lubricant on brake parts?
Use a small amount of light lubricant on pivot points, not on braking surfaces. Too much lubricant on pads or rims reduces stopping power.
Should I take my rollator to a pro for brake issues?
If you find broken parts, internal hub brakes, or major wear, see a qualified technician. Simple tensioning is often a DIY task, but complex repairs deserve professional help.
Conclusion
Learning how to adjust the brakes on a rollator walker keeps you safer and more confident. Regular checks, small adjustments, and basic maintenance prevent most problems. Start with simple tests, use the steps above, and replace worn parts when needed. Try these tips today, and leave a comment or question if you want help with a specific rollator model or issue.

Michael Reynolds is a senior contributor at RetirementGazette.com, where he focuses on helping readers navigate the journey toward a secure and fulfilling retirement. With over a decade of experience in personal finance, retirement planning, and lifestyle writing, Michael combines practical strategies with easy-to-understand guidance tailored for both pre-retirees and those already enjoying their golden years.