Installing a bathtub handrail can make getting in and out of a tub safer for people in U.S. homes. The right method depends on the type of rail: a wall-mounted grab bar needs secure framing or added blocking, while a clamp-on tub rail attaches to the tub rim and does not require drilling.
For the safest result, choose a rail made for bathroom use, follow the manufacturer’s instructions, and do not rely on drywall anchors alone for a permanent grab bar. A loose or poorly placed rail can cause a fall instead of preventing one.
Introduction
A bathtub handrail is an assist device that helps with balance and support. It is not the same as a towel bar, shower caddy, or decorative handle. A proper grab bar must transfer force into the wall structure or the tub structure.
The Centers for Disease Control and Prevention identifies bathroom falls as a serious home safety concern, especially for older adults. A handrail can reduce risk, but it works best with other changes, such as non-slip flooring, better lighting, and a clear path around the tub.
Before you begin, decide whether you need:
- A permanent wall-mounted grab bar
- A vertical or angled grab bar
- A clamp-on bathtub safety rail
- A temporary suction-cup handle
Suction-cup handles are not a substitute for a permanently mounted grab bar. They may lose grip because of dust, soap, textured tile, grout lines, or changes in temperature.

Choose the Right Type of Bathtub Handrail
The best handrail depends on the tub design, wall structure, user’s needs, and whether you want a permanent or temporary solution.
Wall-mounted grab bars
A wall-mounted grab bar is usually the strongest and most dependable option. It attaches to wall studs, wood blocking, or another structure rated for the expected load.
Common types include:
- Straight grab bars: Useful for steady support along a wall.
- Vertical grab bars: Help a person rise, turn, or step over the tub wall.
- Angled grab bars: Offer support at more than one height.
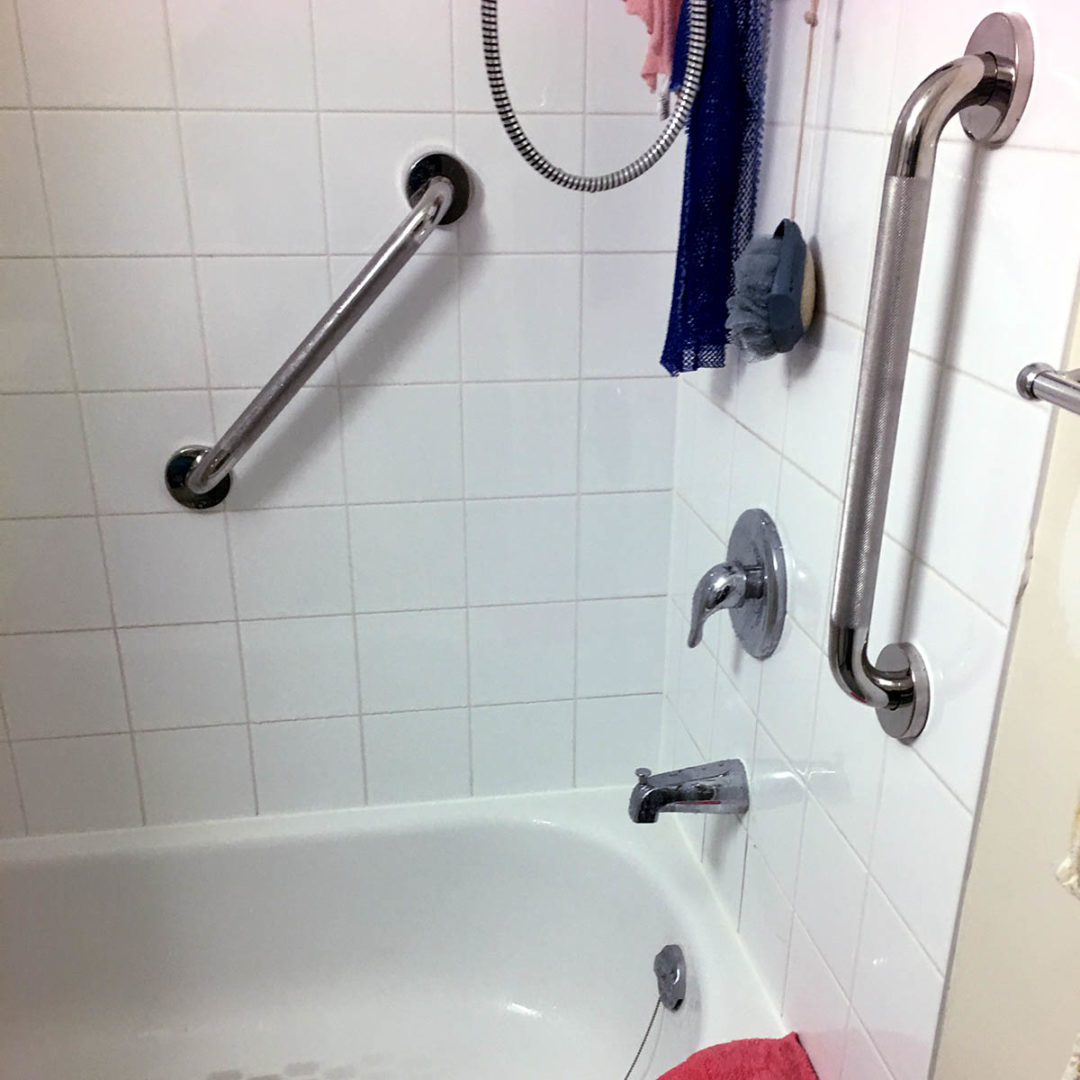
- L-shaped grab bars: Combine horizontal and vertical support.
- Fold-down bars: May help near a seated transfer area but require careful structural installation.
A grab bar should have a textured or slip-resistant surface. It should also provide enough space for the hand to wrap around the bar.
Clamp-on bathtub safety rails
A clamp-on rail grips the top edge of the tub. It can help a person balance while entering or leaving the tub.
This type may work well when:
- The renter cannot drill into the wall.
- The tub rim is strong and wide enough.
- The user needs short-term support.
- The product is approved for the specific tub shape.
A clamp-on rail is not automatically suitable for every tub. It may not fit a curved rim, a thin acrylic edge, a fiberglass shell, or a tub with a built-in surround lip.
Suction-cup handles
Suction-cup handles attach to a smooth, nonporous surface. They are easy to move but can release without warning.
Use them only if the product instructions clearly allow the intended use. Never treat a suction cup as equal to a structural grab bar unless the manufacturer provides a specific, tested load rating for that use.

Where Should a Bathtub Handrail Go?
Place the handrail where it supports the actual movement. The user should be able to reach it before stepping over the tub wall and keep hold of it while turning or sitting.
A common setup includes:
- A vertical bar near the tub entrance for entering and exiting.
- A horizontal or angled bar along the long wall for balance.
- A second bar near the bathing position if the user needs help sitting or standing.
Do not choose the location by appearance alone. Ask the person who will use the rail to stand beside the tub and show where support feels natural. The bar should not force the user to twist, overreach, or lean across wet surfaces.
General placement guidance
U.S. accessibility guidance often places grab bars at about 33 to 36 inches above the finished floor for certain bathroom layouts. This is a design reference, not a universal rule for every home or user.
The correct height may change based on:
- The user’s height
- Whether the person transfers from a wheelchair
- Whether the bar supports standing, sitting, or stepping
- The tub’s height
- The location of the plumbing
- Local building requirements
- The manufacturer’s installation guide
For a wall-mounted bar, leave enough space between the bar and wall for the hand to fit comfortably. The Americans with Disabilities Act Standards for Accessible Design specify a gripping clearance of at least 1½ inches for accessible grab bars. Residential work may follow different rules, but this spacing is a useful safety reference.
Before drilling, use a stud finder and confirm the result with small test holes or other methods. Many bathroom walls have tile, cement board, drywall, plumbing, and electrical wiring. Do not drill where pipes or wires may run.

Tools and Materials You May Need
Gather the tools before you mark the first hole. The exact list depends on the wall surface and handrail type.
For a wall-mounted grab bar
You may need:
- The grab bar and included mounting hardware
- Stud finder
- Tape measure
- Pencil or removable marker
- Level
- Drill and bits
- Tile or glass bit for tile walls
- Wood bit for wood framing
- Screwdriver or driver bit
- Long structural screws approved by the manufacturer
- Silicone sealant made for bathroom use
- Safety glasses
- Hearing protection when drilling masonry or tile
If the studs do not line up with the mounting holes, you may need access to the wall to install wood blocking. In some cases, a specialized mounting system designed for a particular wall construction may be appropriate. Use only hardware with a documented load rating and follow its instructions.
For a clamp-on rail
You may need:
- The clamp-on rail
- Adjustable wrench, if specified
- Tape measure
- Level
- Clean cloth
- Mild cleaner
- Flashlight for checking the tub edge
Do not add random washers, screws, adhesive, or shims unless the product instructions allow them. Changes can make the clamp uneven or damage the tub.
How to Install a Wall-Mounted Bathtub Grab Bar
Install a wall-mounted bar only when you can create a secure connection to framing or a suitable structural backing system.
1. Inspect the wall and tub area
Look for:
- Wall studs
- Existing blocking
- Plumbing fixtures
- Electrical outlets or switches
- Tile, stone, fiberglass, or acrylic surfaces
- Cracked grout or loose wall panels
- Signs of water damage
If the wall flexes, feels soft, or shows stains, repair the damage before installing the bar. A grab bar attached to a damaged wall may pull the wall apart.
2. Mark the intended position
Have the user stand beside the tub. Mark the height and direction that feel natural.
Hold the grab bar in place and confirm:
- Both ends sit over secure framing or approved backing.
- The bar does not interfere with the faucet or shower controls.
- The user can reach the bar before stepping into the tub.
- The bar will not block the shower curtain or door.
- The user can grip it without touching sharp edges.
Use a level for horizontal or vertical bars. For an angled bar, follow the product’s layout instructions.
3. Confirm the mounting points
A standard wall-mounted grab bar should not depend only on drywall, cement board, or tile. Confirm that each mounting plate will attach to a stud, solid blocking, or an approved structural anchor system.
If a stud is not in the right place, do not simply use ordinary plastic anchors. Open the wall and install blocking, or ask a qualified contractor to use a tested mounting method for the wall type.
4. Drill the pilot holes
Use the correct bit for the surface:
- Use a tile bit for ceramic or porcelain tile.
- Use a masonry bit for concrete or masonry.
- Use a wood bit after passing through the wall surface into a wood stud.
- Use low pressure when drilling tile to reduce the chance of cracking.
Do not use hammer mode on tile. Protect the surface with masking tape if the bit tends to wander.
Stop if the bit suddenly moves into an unexpected void, hits metal, or encounters resistance that does not match the expected wall structure. The wall may contain a pipe, wire, metal plate, or other obstruction.
5. Apply sealant where required
For installations in a wet area, apply bathroom-grade silicone around the fastener openings or mounting plate as directed. The sealant helps limit water entry behind the wall surface.
Do not cover drainage holes or use sealant as the only way to hold the bar in place. Silicone seals; it does not replace structural fasteners.
6. Attach the mounting plates
Position the bar and install the fasteners according to the manufacturer’s instructions. Tighten each screw evenly.
Do not overtighten screws into tile or fiberglass. Excess force can crack the surface or crush the material. The fastener must be tight enough to prevent movement, but the mounting surface must remain intact.
7. Check the bar before use
When the bar is installed, pull it in several directions:
- Downward
- Upward
- Toward the user
- Side to side
The bar should not rotate, shift, creak, or pull the wall surface away from the framing. A visual check is not enough. If it moves, do not use it until the mounting system is corrected.

How to Install a Clamp-On Bathtub Safety Rail
A clamp-on tub rail is simpler to install, but it still needs careful fitting and testing.
1. Confirm tub compatibility
Read the rail’s instructions and compare them with the tub. Check:
- Tub rim width
- Rim thickness
- Tub shape
- Material
- Surround lip
- Clearance near the faucet and wall
- Maximum user weight listed by the manufacturer
Do not install the rail on a cracked, flexible, damaged, or visibly weak tub edge.
2. Clean and dry the contact area
Remove soap film, oil, and dust from the tub rim. Dry the surface fully.
A dirty or wet contact area can reduce friction and make the rail slip. Do not apply wax, polish, or household oil to the contact points.
3. Position the rail
Set the rail over the tub rim where the user can reach it before stepping over the side. Keep the rail clear of the faucet, shower controls, and curtain.
The base should sit flat. If one side rocks or the clamp does not meet the rim evenly, stop and check the fit.
4. Tighten the clamp evenly
Turn the adjustment knob or fastener as directed. Tighten until the rail is firm.
Do not use a pipe wrench or excessive force. Over-tightening may damage an acrylic or fiberglass tub. If the rail still moves after correct tightening, it may not be compatible with the tub.
5. Test the rail gradually
First, press down lightly with one hand. Then apply more pressure while standing beside the tub.
Do not immediately place your full body weight on a newly installed rail. Test for:
- Sliding
- Tilting
- Rotation
- Tub flex
- Cracking sounds
- Damage to the rim
Retighten only if the instructions allow it. If movement returns, remove the rail and choose a different model or a permanent wall-mounted solution.
How to Test and Maintain a Bathtub Handrail
A handrail needs regular checks because moisture, use, and wall movement can affect the connection.
Check the rail:
- After the first day of use
- After the first week
- At least once each month
- After cleaning or remodeling
- Any time the rail feels different
Look for loose screws, cracked tile, damaged sealant, rust, bent parts, and movement at the base. Clean the grip with a mild cleaner that will not leave a slippery film.
For a clamp-on rail, remove it from time to time and inspect the tub rim and contact pads. Replace worn or hardened pads if the manufacturer provides replacements. Do not use tape, cardboard, rubber scraps, or household glue as an improvised repair.
A sign of success is simple: the user can reach the rail without stretching, grip it with a dry or wet hand, and move without the rail shifting.

Common Installation Mistakes to Avoid
Using a towel bar as a grab bar
Towel bars are usually not designed for body weight. Their brackets may attach only to drywall or light-duty anchors.
Relying on ordinary drywall anchors
Most standard plastic anchors are not a substitute for framing or a tested grab-bar mounting system. Bathroom wall surfaces can look solid while having little strength behind them.
Drilling without checking for utilities
Plumbing pipes and electrical cables may run near a tub. Use caution, inspect both sides of the wall when possible, and stop if the drilling feels abnormal.
Ignoring the wall surface
Tile, stone, cement board, fiberglass, and drywall require different drill bits and fasteners. A method that works in drywall may crack tile or fail in a tub surround.
Placing the bar too far away
A bar that looks tidy but requires the user to lean or twist can increase fall risk. Install it for the person’s movement, not only for visual symmetry.
Treating a suction cup as permanent support
Suction can weaken because of surface texture, soap film, temperature, and air leaks. Use a structural solution when the user needs dependable body support.
Skipping the final force test
A loose bar may not look defective. Test it in several directions before anyone uses it in a wet tub.
When to Hire a Professional
Call a qualified contractor when:
- You cannot locate suitable framing.
- The wall is tiled and you are unsure how to drill it.
- The wall shows moisture damage.
- Plumbing or electrical lines may be behind the drilling area.
- The tub or surround flexes.
- The user needs wheelchair or assisted transfer support.
- The installation must meet local accessibility or building requirements.
- The handrail will be used for significant body weight.
For a person with limited strength, balance problems, or a recent fall, an occupational therapist may help identify the safest bar type and position. A medical professional can also help address the cause of repeated falls.
Key Takeaways
- A permanent grab bar should connect to studs, blocking, or a tested structural mounting system.
- A clamp-on rail must match the tub’s rim shape, width, material, and condition.
- Do not use a towel bar or ordinary drywall anchor as a body-support device.
- Place the rail where the user can reach it before stepping over the tub.
- Test the rail in several directions before use and inspect it regularly.
- Hire a professional when the wall, tub, plumbing, or user’s mobility needs create uncertainty.
FAQs About Bathtub Handrails
Can I install a bathtub grab bar without studs?
You can install one without directly locating a stud only if you use a mounting system specifically tested for the wall construction and load. Ordinary drywall anchors are not enough for a permanent support bar.
Are suction-cup bathtub handles safe?
They may be useful for light balance support on an approved smooth surface, but they should not be treated as equal to a structural grab bar. Follow the product limits and inspect the suction before every use.
How high should a bathtub handrail be?
There is no single height that fits every user or tub. A common U.S. accessibility reference is 33 to 36 inches above the finished floor for certain grab-bar locations. The user’s reach, transfer method, tub height, and local requirements may change the best position.
Can I attach a grab bar to a fiberglass tub surround?
Only if the installation system is designed for that surround and connects to suitable structural support behind it. Fiberglass alone may flex or crack under load.
Should a bathtub handrail be horizontal or vertical?
A vertical bar often helps with stepping over the tub wall, while a horizontal or angled bar can help with balance and sitting or standing. Many users benefit from more than one bar, but the layout should match the person’s movement.
How much weight can a bathtub grab bar hold?
The safe load depends on the specific bar, fasteners, mounting system, and structure. Use the manufacturer’s documented rating only when the bar is installed exactly as directed. A rating does not make an improperly installed bar safe.
Conclusion
To install bathtub handrails safely, first choose the correct type for the tub and the user. For dependable long-term support, install a wall-mounted grab bar into studs, blocking, or an approved structural system. For a temporary option, use a compatible clamp-on rail and check it often.
The next step is to inspect the tub, locate the wall structure, and mark the position while the intended user stands beside the tub. If the wall or tub cannot provide a secure connection, stop before drilling and contact a qualified professional.

Michael Reynolds is a senior contributor at RetirementGazette.com, where he focuses on helping readers navigate the journey toward a secure and fulfilling retirement. With over a decade of experience in personal finance, retirement planning, and lifestyle writing, Michael combines practical strategies with easy-to-understand guidance tailored for both pre-retirees and those already enjoying their golden years.